Wednesday, 28 December 2011

Comparison of Original and Own Production of Collateral

Compared to the original of Collateral, I think we did really well with our own remake even though  we were only able to produce 16 seconds due to the amount of time we had. This is because we firstly chose to shoot the film outdoors where we ended up having trouble with the lighting and we needed extras, a  busy background crowd which were nowhere to be seen. Therefore we decided in the same lesson that we should actually go back indoors, as the lighting would aslo be brighter. In our next lesson we looked over the recorded footage and realised that not all of the shots were in focus and also needed more shots. So we took more shots, looked over them again too and they were perfectly in focus. Finally we edited the clips on 'Final Cut' and produced a final remake of Collateral but we never had enough time to add many effects or any sound to the clip. 

The use of mise-en-scene we didn't need much props and the original clip was mainly located at one setting so it was just right. Luckily someone in the group had sunglasses, that in the original clip Tom Cruise is wearing sunglasses and we thought we could also use it too. In the original clip we see him also picking up a bag, we used a similar bag as well.

The lighting in our clip was just right compared to the original clip too.

The use of camera shots were rather good, as we used our storyboards which helped us to get the right shots at the right time. Unfortunately we never had enough time to get many shots for the most of the clip but we did end up getting quite a few perfect shots.

The editing of the clip we never used many edits but we chose one or two effects that worked really well as each clip changed to another. But after watching other remakes of Collateral we could have used more effects, such as slow motion.  


Overall I was happy with our remake, however we could have improved the clip with more effects and more shots of the scene. But after doing this clip I now have an idea of how to produce a  recorded footage and edit it using final cut, and also use the time given wisely next time.


Wednesday, 14 December 2011

Analysing reinactment of Collateral...


I think our reinactment of the clip from Collateral was pretty good considering the amount of time that we had to shoot the film, we was only able to get a good 16 seconds overall from all of the shots that we took because we had a lot of rouble with lighting and setting, we also had some trouble with our extras because we needed to get a backing crowd, so that took quite some time to get people to act as an extra in our film.

I think that the use of Mise En Scene in the film was just right because we did not really want to use a load of different props, because them it might get confusing to the audience as they wont really know what is going on, in the original clip from collateral to lead actor is Tom Cruise and he wears a pair of sun glasses, so we thought that bringing in a pair of sun glasses of our own might give our film something different that might improve the quality of our film

The camera shots in the clip that we created were more or less the dame as the shots in the original clip from the film Collateral, when we first started filming our clip from Collateral we did have some issues with the focus because we filmed the first half of the clip out of focus, this was a good thing in some ways because if we look at the original clip from Collateral you can see that a lot of the clip is out of focus anyway, but in the shots that we took it was so out of focus, you could barely make out what was going on. That is why we ended up with such a short clip because we decided the best thing to do is go out and re shoot the whole thing.

When it came to the editing i really enjoyed it because it was good to fit all out shots together in a way that made sense and told a story, even though it was not exactly like the original clip from Collateral I still think it is pretty good. Now we have watched our final clip and all of the other groups clips I regret not putting more effects on it such as slow motion to make it more appealing to the audience.

Overall for a first time using the equipment and a first time using the editing software I think we did a good job because it could have been a lot worst, now that I know how to use the all the equipment and the editing software I feel that I can be able to go out and film my thriller film or another reinactment of another film. During this project we did make a few mistakes like the focus but you can only learn from your mistakes and hopefully the next time we go out, we will be able to get a good couple of shots that we can then turn into a masterpiece.

Below is just a few screen shots of me and my group using the editing software... 


Collateral Final

Tuesday, 13 December 2011

My idea for a thriller film...

My idea for a thriller film is that a mental patient escapes from an institute and runs riot around the city, he kills anyone that he comes into contact with, we can take some shots like the one that you see to the left of someone sitting in the bathtub with blood dripping down the walls, or dripping down the side of the bathtub. we can buy some fake blood from the shops and use it to add a horror vibe to our film.

We can also have a shot with the psycho sharpening his knives in the kitchen, or wiping the blood of his face, I also think it might be a good idea for the psycho to lick the blood of the knife to make it more realistic.

Monday, 12 December 2011

Health & Safety


MONDAY, DECEMBER 12, 2011

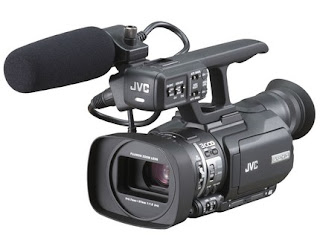
   In our health and saftety tutorial i was able to learn how to use the Jvc Camera in a safe and secure manner considering how valuable and expensive they are. We were taught basic funtions like switching it on and off, how to open and close the lense and how to insert the memory card.We learnt different strategies and adjustments of how to get the best shots under different circumtances. For example, depending on what time of day it is, it cant be changed to either manual or automatic.Throughout this lesson we were shown the different tools and equiptment which accompanied this camera such as the memory card. The memory card is a very important aspect of the camera as it contains all the footage taken by the camera, Therefore it comes with its own case which keeps it in safe conditions, avoiding damage.

The Tripod is another peice of equiptment that comes with the cam corder. This is to help keep the camera placed in a raised and still position. The long stick at the top manages the movement of the camera such as panning. We were taught how to inserted the camera making sure that it is firmly connected to the tripod. Also we were to make sure that the legs were spead out evenly to prevent any wonkeyness.


Finally we were to how to insert and eject the battery in the right place and to not shot in bad weather conditions but to handle them carefully.

Health and Safety Tutorial..

In our Health and Safety tutorial we were introduced on how to use the following equipments to use for our thriller film: 
  • JVC camcorder
  • memory card
  • battery 
  • tripod

First we learnt the basic steps of how and where to insert the battery and memory card.After we were told about the different buttons and functions of the camcorder, such as how to turn it on/off, the maunal or automatic focus button which would be used to get the best possible shots depending on the time of day and how to use the zoom in and out button, and how to play back recorded footage too.

Next we were introduced to the tripod, which is used to hold the camcorder steady when recording a footage.The tripod should be set up safely and securly, and the camcorder should be removed gently without being damaged.  At the end we were remined that we should never leave the camera out in the rain, promptly return the camera back to college on time and mainly use and take care of the camera safely, as it's very expensive and also never leave the camera unattended.  

Sunday, 11 December 2011

Shot by Shot Storyboard - Collateral (2004)

 This is my shot by shot storyboard of the film Collateral (2004)
 from 0:33 - 0:44 seconds.The clip mainly consists of a worms eye view shot, medium shot and over the shoulder shots.


Saturday, 10 December 2011

Shot by Shot STORYBOARD

This is my shot by shot storyboard from the 22nd - 33rd second of the film collateral, the clip consists of a two man shot, over the shoulder shot and a worms eye view shot.


Thursday, 8 December 2011

Health and Safety tutorial...

In our Health and Safety tutorial I learnt how to use the cameras in a safe and responsible way, I now know all the ins and outs of the cameras, we were taught how to get the best possible shots under different circumstances, for instance we know how to put the cameras in automatic and manual mode depending on the time of day you are shooting, we also know how to put the cameras in focus so we can get the best shots possible. We were also taught how to use the tripods in a safe and secure manner, we now know how to set the tripods up, we are now able to go out and use the cameras to film our thriller opening.

During our tutorial we were taught how to set up the tripods and connect the cameras on them, it is important to know how to use the tripods because when we go out we will need to be able to get the best shots possible for our thriller film. we were also taught how to secure our cameras in the tripods and remove them. We were then given a Health and Safety tutorial on how to use the tripods in a safe and secure manner because the tripods can be dangerous if you dont use them in a careful way.


 Lastly we were taught how to use the battery in a safe and secure way, we now know how to place the battery in the camera without causing any damage to the camera or ourselves, it is important that we now know how to use the equipment in a safe way because the cameras are really expensive so we cant damage any of the equipment.

I now know how to use the equipment so i feel that i will be able to go out and film my thriller opening without causing ant damage to the cameras or anyone else in my group.


Wednesday, 7 December 2011

Conventions of film openings...


In the opening scene of unknown there are a view traditional film conventions that are used, including

Introduction to studios involved in making the film
Production logos & Distribution logos
Title screen
Actors in the film
Low lighting
Editing
Sound


All of these conventions are used to inform the audience of what to expect in the film, the use of editing and sound can create a very dark feel to the film that will appeal to the audience who like a good thriller film, even the use of camera shots in the first scene give us the impression that this is going to be quite a dark, violent film.

at the start of the film there is a zoom out shot from a window of a plane, from this shot a man is revealed on the plane, his face is almost completely blacked out which gives us the impression that this man will be one of the main characters, and from the low lighting we can tell that this man will be trouble, we can already tell that he has some kind of bad past, and we can tell all of that through the use of lighting. 


Introduction To Camera Task

After we had our introduction to the camera, 
we practiced the different camera shots.
 
Big Close Up - 
shows us the persons facial expression.


Worms Eye View Of Feet -
we can see the movement of the shoes clearly, as it's walking towards the camera.
Over The Shoulder Shot
is commonly used whilst two or more people are having a conversation.
Rule Of Thirds -
is effective to use, as it shows the character and the background well.
Wide Shot Of An Area -
 we've taken a shot of the lifts in the corridors, i think its taken quite well.
 

Introduction To Cameras - Majeda

Introduction to camera work...

Today we were given a tutorial on how to use the cameras, we were taught all the ins and outs on how the cameras work and what we need to do to make sure we get the best shots that we possibly can. We were then set the task to go out in our groups and film each other using different shot types, you can see below that we took a close up shot, wide angle shot and birds eye view shot, we were also experimenting with the rule of 3 meaning that we were changing the position of the person in the frame so that they were dead in the centre, making them the focus of the shot.


Wide angle shot
Close up shot
Rule of 3
Over the shoulder shot
Worms eye view shot 

Monday, 5 December 2011

Conventions of Film Openings - unfinished

  In film openings you will always have the production logos and distribution logos appearing at the start.